Ducati.ms - The Ultimate Ducati Forum banner

Under-seat Battery Mounting With Motolectric Kit

42K views 53 replies 26 participants last post by  motolectric  
#1 ·
I have been working with Michael Heth of Motolectric to come up with an under-seat mounting system that keeps the ability to but the bike back to stock.

This system uses a Shorai LiFePO4 LFX14A2-BS12 battery on a quick disconnect so it can be removed on cold mornings and warmed up for easier starting. I also ordered a 26” solenoid to starter lead so I could route the wire to the left side away from my belts.

All the Motolectric components were of top quality and look strong enough to start a tank!

These are the installation steps I came up with:
1. Remove the voltage regulator.
2. Cut off the two unused plastic lugs in picture-1 (they will push the battery into the seat pan).
3. Relocate the voltage regulator under the seat with some m6 screws. Use metal spacers to hold the VR off the electronics tray a bit for cooling, see picture-2.
4. Install the battery with some adhesive backed Velcro in the location shown in picture-3. (The grey tray is not required)
5. Install the quick disconnect to the battery and attach to tray, picture-4.
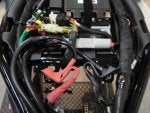
6. Connect to the old battery and carefully wrap connection to prevent shorts, see picture-5. Zip tie connections to the bottom of the rear tank mount. (I bolted mine with rubber washers)
7. Remove the old solenoid and ground leads, insulate the ends and loop them back out of the way.
8. Install the new Positive & Negative leads and tie off.

Finally put modeling clay on any high spots and install your seat to check for clearance. I did this with an 06 Monoposto, and it just fits. Someone will have to test it with a two-seater..


Cheers,
Lee
 

Attachments

#4 ·
Madlag,

Won’t know about how it starts for another month or so… I have the cam pulleys and tensioners off for a lightening & beatification project, the good news is the parts just came back from finishing and I can start putting it back together.

The bike sure looks light and cool without the battery box.

Lee
 
#6 ·
Regarding, will it start?

My LFX14 starts the bike with no trouble at all on warm days, but after a cold night (less than 50f or 10c) it really struggles, and won't get the bike going until load has warmed it up. This can take ten minutes of messing about and feathering the throttle - probably not great for the bike either, as it then pops an bangs into life.

If you live somewhere warm all year round, then stick with the LFX14, or, if you can whip the battery out overnight then no problem, and with a removeable seat plus those anderson connectors, it should take less time that taking your helmet and gloves off... Top marks to Motolectric.

If I lived in the US, and didn't have to wait for 30+ days for overseas purchases, and the pay shipping plus 20% import duty, I'd buy Micheal's kit now, but in the meanwhile, I've taken the easy route - of more amp hours and a bigger unit, - so for now I have the LFX18 installed (which also fits fine) - as London is cold right now, and it only cost me an extra $30 and took 24 hours to arrive.
 
#7 ·
I been considering the LifePo battery option for a while now and like the quick disconnect idea but would like to leave a secondary battery in place to run the clock, immobilizer, alarm etc. The problem is finding a secondary battery that is small enough to fit underseat with the main battery. I think this would be especially handy for multi-day rides.
 
#9 ·
Could you please give me the correct meassures. If I goto their site, both the european and the .com site. The meassures, shown on both the LFX14A1-BS12 and the LFX18A1-BS12. Are exact the same size as the original YT12B-BS Lead batteri.

So looking at your pictures, I cannot find out how the h*ll you can fit that into that tray.
 
#19 ·
If this helps avoid confusion...

LFX14(Case size 2) vs LFX18 (Case size 1)

14
Image


18
Image


14
Image


18
Image


I think I could get the OEM set on with the 18 fitted, but I need to move the ECU to the Reg/Rec mounting holes, and even more likely if I trim the underside plastic bracing of the seat base down a few mm.
 
#24 ·
If this helps avoid confusion...
LFX14(Case size 2) vs LFX18 (Case size 1)

I think I could get the OEM set on with the 18 fitted, but I need to move the ECU to the Reg/Rec mounting holes, and even more likely if I trim the underside plastic bracing of the seat base down a few mm.
Okay, this is the info I missed the first time through . . .

although you show it under seat, are you saying that you have not gotten the seat back down onto the bike for riding?

Or am I missing something?

I just want to know if the 18AH fits under the seat and if the seat fits back on the bike.

Thanks for any info.
 
#20 ·
I think I could get the OEM set on with the 18 fitted, but I need to move the ECU to the Reg/Rec mounting holes, and even more likely if I trim the underside plastic bracing of the seat base down a few mm.
Gentlemen, a couple of things to consider.

On the Monoposto bikes only - larger batteries can be fit by moving the ECU forward and putting the battery in the back under the tool kit. There are plenty of threads out there on that solution.

At 2.28" thick, the Shorai LFX14A2-BS12 mounted in the forward position comes within 0.1" of the underside of the seat (someone will have to check if this is the same on a Biposto). All other Shorai batteries are too thick for forward mounting and will hit the stock seat.

I am hoping this can be a universal installation for us weekend warriors. Daily commuters should consider a larger battery for cold mornings. The rest of us should be able to pull the battery out and warm it up for rides on cold mornings.

Cheers,
Lee
 

Attachments

#21 ·
LD, nice job! Thanks for those excellent and informative pictures! That's how it's done!

As for putting a stock battery on it's side, that wouldn't be a good idea because the fluid inside could leak out (water/acid solution).

Lee...what's up with the picture? It has nothing to do with the subject at hand?:confused:
 
#34 ·
It's my understanding, from somewhere long ago in this forum, that the side covers aren't plug-n-play for the monos but I think a couple minor tweaks was all it took. Anyone remember for sure?

And isn't it past your bedtime? :p
 
#35 ·
I've been thinking about this modification lately, but have one question - would it be possible to install the battery in an upright position (with Monoposto seat storage tray removed) to allow for the RR to be kept in the stock location?

I would love to be able to remove the battery box AND keep the RR hidden as well.
 
#36 ·
The Ballistic 12 cell LiFePO4 battery is laying down in my mono. At the time of installation it looked like it would fit upright if moved rearward which would've entailed more work and placed the weight farther away from the bike's center of gravity. If you have a solid state R/R it would probably work. IMO The R/R really can't be seen if relocated unless you bend over to look at it. But a hugger is probably a good idea with a relocated R/R.
 
#37 ·
Hello,

I got the wired under the seat kit. Very high quality stuff. I made all the under seat modifications. But I am little fuzzy on the other end of connections and the path of the wires. Does anyone have pictures of final installed product on the solenoid and starter. Especially path of wire coming around the other side and the engine. I have a gt100. The on line install guide confuses me a little.

Thanks.
Sebouh
 
#39 ·
I originally had the 8 cell "SpeedCell" battery installed for almost 3 years. With the 1100cc and high compression, it just wasn't cutting it. If it started on the first 1-2 cranks it was fine, but on a cold day, it would drain it. I decided to install the 12cell Antigravity Battery. It was still small and light weight and made in USA.

I had to completely reposition everything to make it work. The regulator was already underneath the tray, so it was time to put the ECU where the regulator was. Then I made a nice little battery tray on the rapid prototype machine at work. Designed it to use the stock rubber strap from the original battery case. I had to remove the storage box cover in the seat because of the height. The bike now turns over faster, and keeps up even in a cold day.

Check it.

Image


Image


Image


Image
 
#40 ·
Thanks for the photos, Lee! They really helped me with the install.

And Michael at motolectric, great kit!!!! Saves a ton a weight, cleans up the look of the bike, and starts up instantly. I highly recommend it!
 
#41 ·
While my bike was at the shop undergoing other "improvements," I had this done. Thank you LeeC for the step by step instructions and advice! One deviation was done from the installation instructions: step #6 which involves wrapping the old battery connections to the new quick connect wiring. My shop tech scavenged the wiring from the old battery connections, resoldered it to the new quick connect wiring and then wrapped it. His concern was that the old battery connections were rather sharp and bulky and could cut possibly through any wrapping and cause a short or worse a spark/ fire. Just passing this on.

Regulator rectifier under the seat now and now to decide what to do with those battery case nubs. The quick connect makes it easy to remove the battery and perhaps its just me but I found access to the old battery to attach my Battery Tender in the battery case a real pain in the a**.

Other related threads FYI:
http://www.ducati.ms/forums/77-spor...orums/77-sport-classic/132699-motoelectric-under-seat-battery-hicap-cables.html
http://www.ducati.ms/forums/77-sport-classic/355121-plug-play-lithium-battery-best-one-2.html

http://www.motolectric.com/makes/ducati.html
 

Attachments

#42 · (Edited)
Hello Sport Classic Riders-

We're happy to now offer a battery tray based on the 3D model that Lee worked up.

Basically it's exactly what he made but in black ABS.

We have it on the site now and riders who bought a HICAP II underseat relocation kit will receive an email from us this weekend.

Cost is $100 for the custom kit with the battery retainer and SS Bolts.

Photos below show what you receive and how nicely the whole relocation kit and battery tray work together.

On a performance note, any efforts to minimize vibration reaching a battery is worthwhile.

No battery does well with excess vibration.

Image


Image


Email us direct or post here if you need/want more info.

Thanks,

M./